Showing posts with label Hand-carved stamps. Show all posts

Monday, January 13, 2014

Printing another checkers game


I made this game for my husband for Xmas. Quite the rush printing it the day before, with the ¨help¨ of my kids! It is a kind of variation of checkers, where the aim is to end up with the piece which is in the middle of your row in the centre square. The various pieces have different rules for moving. I didn't make up the rules for the game - I saw it in the shops just before Xmas, and printed my own version. The stamps I used to print it are the same ones I used for the handmade checkers game a few years ago.


Sunday, December 4, 2011

The Woman in the Moon print


This is a linocut I´ve been working on for several months! Finally finished. It is an illustration of the first myth/tale in James Riordan´s great (but sadly out of print) book The Woman in the Moon. I am really happy with this, as it has turned out the way I envisaged in my head.

One of the activities in Carla Sonheim´s book Drawing Lab is to illustrate a book or tale you like. I started to do this, and decided to make it a linocut instead. However, I have also been researching using different materials, block printing inks, and did this on blue vinyl instead of lino.

The blue vinyl is like butter to cut. I did find that it printed a lot better than lino, whether using oil based or water based block printing ink, and regardless of the quality of the paper. SO I might move over to the blue vinyl now perhaps. Also, I have had alot of trouble with crumbly lino (even after heating) which is apparently what happens when the lino is past its use-by-date.


Friday, October 14, 2011

Matroshka bags


My final act as Education Officer for our Playcentre is to make some small presents for trainees. These are small calico bags printed with a matroshka stamp, which we then filled with chocolates. I made the cards from other hand-carved stamps I´ve made too.

Friday, October 7, 2011

Handcarved chair stamp

I finished a quick stamp of a chair this week. Still needs a bit of a clean up when I get chance, but I´m quite happy with it.

Wednesday, October 5, 2011

Linocut ruru owls - my first commissioned stamp!


I carved this linocut stamp for an amazing puppet theatre business which two friends are starting up, Two Little Ruru. The wonderful ruru design of the stamp was done by the amazingly talented Kate.

Wednesday, September 7, 2011

Stamped bookmarks


I was experimenting with my russian-themed handcarved linocut stamps, and thought I´d make some into bookmarks. I like these, although I won´t be using the textured paper (far right and 2nd from the left) again. I´m a bit suprised at how hard it is to get a good print off the band of trees stamp. My online research says that I may need more pressure for the printing, or to try dampening the paper. Some sites also suggest that linoleum can be slightly uneven and may warrant sanding down before use, and has a shelf life of 6 months (who knew?). I have had better prints after heating the block-printing ink before use, and I´m wondering whether heating the lino before printing might have some effect. I´m curious to try all these things.

Gratuitous picture of Otaki Forks, North Island, New Zealand

Saturday, September 3, 2011

Russian themed handcarved linocut stamps


I´ve seen some amazing russian themed stamps on the internet and thought I would try something in this style. The russian doll stamp was inspired by this amazing print, the original so much better than my imitation.

The paper in the lower picture is quite textured and the long tree-lined stamp doesn´t print well on it. But I´m happy with the stamp design, and I´ll just do it on smoother paper next time.

I used red and sepia FAS water-based block printing ink. I think if I used green instead of sepia, these could be Xmas cards for my cards to my family.

Noho ora mai means ¨Stay well¨ or ¨Good health¨ in maori.

Handmade envelopes from A4 paper


I´ve made some hand-stamped envelopes from A4 paper, and I thought I´d put up a tutorial on how to do it. Why not.

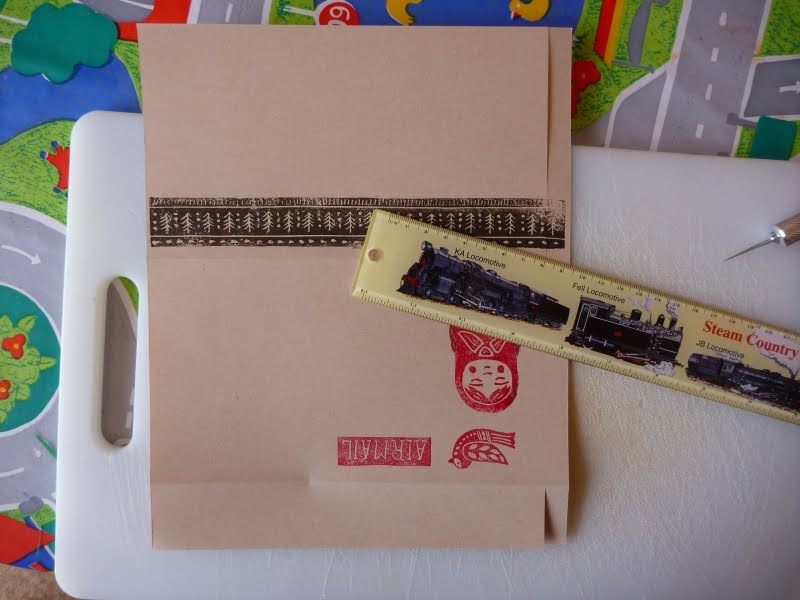
Step 1 (above). Start with an A4 piece of paper. I´ve already stamped the one above. It will make sense where the stamps need to be placed once you see one finished. In the above photo, I had a sun stamp that was meant to be in the centre of the back of the envelope, So I measured whether it was in the centre, found it was off bit a bit, and trimmed it a bit at the side.


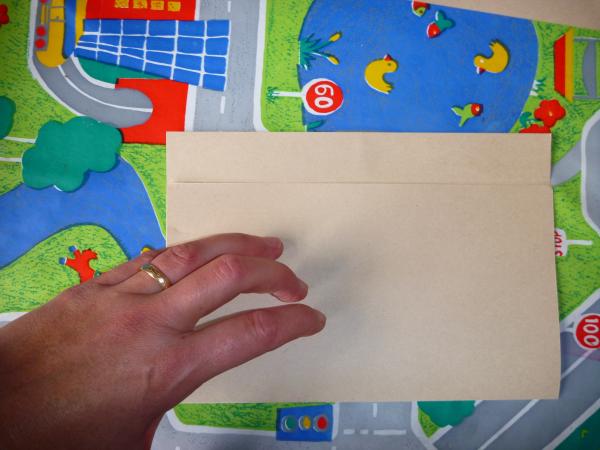
Step 2 (above). Fold the bottom half of the paper up to within about and inch short of the top of the page.


Step 3 (above). Fold the top leftover inch of paper down. I´ve used a different envelope to show this step, as I forgot to take a picture of this step when doing the original tutorial.


Step 4 (above). Lay it flat again. The envelope in three parts. On the far left is the back of the envelope, the middle section will become the front of the envelope, and the tiny right hand section is the flap. Put a ruler about half an inch in from the side and with a craft knife cut a line along the left section and the right section only, LEAVING THE MIDDLE UNTOUCHED.


Step 5 (above). Cut a notch out of the top and bottom of the middle section as shown, which will make the two cut bits fall off. Repeat for the other side of the envelope. See photo below for how this looks when done.


You can see now how the stamps need to be placed for an envelope. That is, they need to be in far enough from the side to leave enough room for the side flaps. When I am stamping an envelope, I fold it first (as in step one), and just guess how much room to leave for the side flaps.

Step 6 (below). Now cut a notch out of either side of the envelope flap as shown below.


Step 7 (below). Fold the side flaps in. Its easiest to do this if you fold the back up first.

Step 8 (below). Unfold the envelope again as shown and put glue on the side flaps as shown.


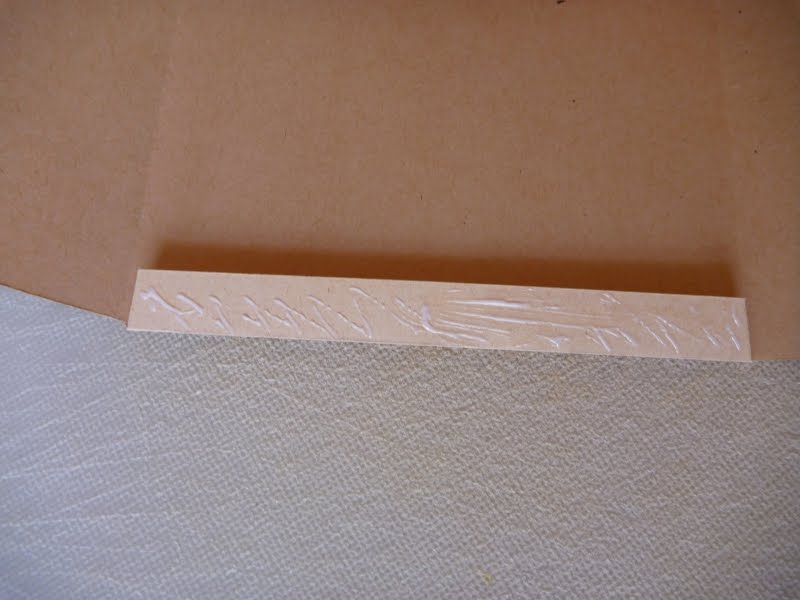
Below: this is how much glue I use. If you use too much it will warp the paper.


Step 9 (below) Fold the back of the envelope over and press it onto the glued flaps. Run your fingers tightly along it to press the glue flat and make it stick well.

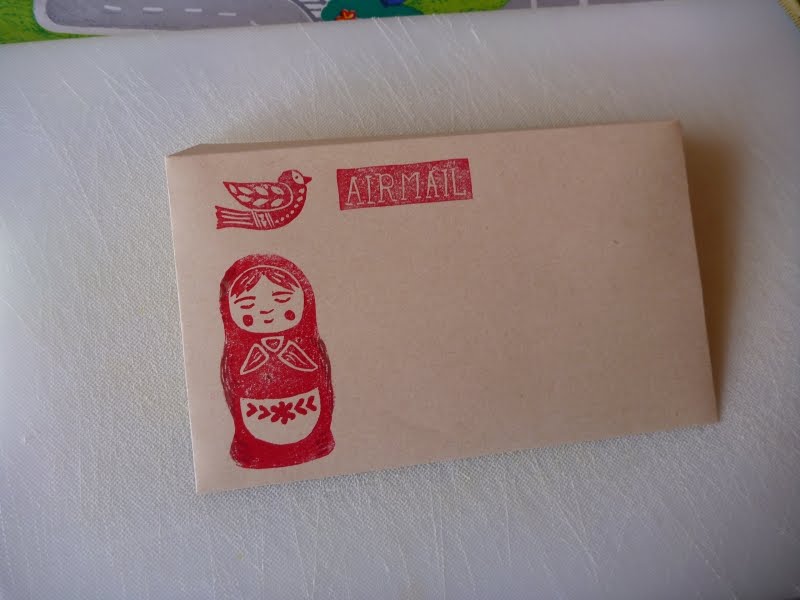
This what the front of the envelope will look like (below).


And this is what the back of the envelope will look like (below). The side flaps have been folded in and the back pressed over them, so they are no longer visible. The top envelope flat is not glued yet (after all, you have to leave it open until you are ready to send the letter!).


When you are ready to send the envelope, I would just glue the top envelope flat closed with glue again. However, if you want to have self-adhesive glue on the envelope flap (for example, if you are selling envelopes for a person to use themselves later), then there are remoistenable glue recipes here. I haven´t tried them yet though.

Have fun!

Monday, August 29, 2011

Linocut handstamped cards


I finally got around to doing a mass print of my linocut stamps and they turned out really well. I´m now working on the envelopes. I´ve worked out a great envelope pattern and I´m working on some homemade remoistable glue recipes and on making some stamps that fit in well with the envelope size (stamped beside the address).


Kaikoura, South Island, New Zealand

Thursday, August 25, 2011

More ruru feet wheat packs


I´ve done some more ruru hand-stamped feet wheat packs as presents for Playcentre people finished their training. I haven´t done the inserts yet though. I stamped these ages ago, so its great to get them finally made up.


Thursday, August 18, 2011

Linocut of Pinehaven Road


This is a linocut hand-carved stamp that I have been working on for ages now, finally finished.  It is done with sepia-coloured block printing ink and a rubber brayer. I´m not sure whether I´m pleased with the actual printing. On the one hand, I like the texture and the roughness of it. I wasn´t wanting it to be precise and exact. However, the road is meant to be pure colour. I may have to look at diluting the block printing ink and using a foam brayer.

Anyway, here are the various steps it went through.

One of the original sketches above. No people planned in the picture.


The final sketch, with the outlines blackened with a 6B pencil, ready for transferring in reverse to the linoleum.

Above: the linoleum with the design transferred from the paper. I´ve just started to do the cutting and am wondering whether this is all such a good idea after all. The cutting of the stamp took me months. There is only a very small window of time each day where the natural light on our kitchen table is perfect for cutting AND my baby is asleep.


Above: the first draft of the stamp. I felt the picture was too dark. The trees needed to stand out more - you can´t really see them swaying in the wind. The grass was too dark. The sidewalks needed to be white and the people needed to stand out more.

Below: is the final print with these changes made. I think the lines of the white spaces of the asphalt below the hall, and the white sidewalks kind of draws the eye in towards the road, and then follows the road. That´s kind of a confused line for the eye to follow maybe. But, on the other hand, it is a windy day, with the trees being blown this way and that. Maybe having the eye follow a this-way-and-that line could be a good thing? Mmmm. It may have been better to leave the asphalt square as it was. Bit late now...


I´d initially planned doing a series of six of these, of various scenes around Pinehaven / Silverstream. I´m not too sure whether I´ll do this. The whole project really took a very, very long time.

Sunday, July 10, 2011

Handprinted Checkers/Draughts Game


Yay! I´ve finally finished my hand printed, handmade checkers/draughts game. The pics are a bit unclear and I´ll put up better pics soon. The board is calico fabric, with the squares stamped.

One picture shows the beanbags main side, and the other shows the other beanbag side which is used when you king a piece. The beanbags are made from fabric, which has been hand-printed with hand-carved stamps I made from linoleum.

I´m really happy with it and there were lots of creative steps in it. I enjoyed carving the linocut stamps and figuring out the colours. There wasn´t a huge amount of work in it, but it took quite a long time to do, fitting it around work and kids.


My husband even played a game with me last night, and I won (I think he might have let me win). Here is a pic of him playing against our cat, Tess.

Kapiti Beach looking towards the South Island, Kapiti Coast, North Island, New Zealand

Sunday, May 29, 2011

Stamped stationery

I´ve been considering teaching a demonstration class in linocutting and hand-carved stamps at the local library. [This didn´t come to pass as I´ve been too busy.] I´ve used or given away alot of the things I´ve printed already, so I bought some sepia block printing ink and printed a few sample pages, cards, and envelopes. They turned out really well. Block printing ink is a lot thicker than the fabric ink I´ve been used to. As you´d expect, it prints a lot better on paper and it´s easier to apply the tiny amounts required for paper.

Saturday, April 30, 2011

Handmade checkers game printed

I finished the printing for the checkers game ages ago, and finished the sides. So that´s done. The board is all straight, I´ve just taken the photo on an angle to avoid the flash. It took me two hours to handprint it, with a handcarved linocut stamp which I made of a wave design. Each square is about 8cm x 8cm (approx 2.5 inches square). I didn´t use the previous ocean design stamp I carved because I was running out of fabric and it would have been too big, and possibly too complicated. Over such a large board, the background squares need to be quite simple or the eye finds it too hard to spot the checkers pieces on it.

All the beanbag checker pieces are printed now too, with handcarved linocut stamps I made, and I just have to cut them out, sew and fill them...
[Here it is finished.]

Wednesday, April 27, 2011

Handstamped t-shirt

After one unremovable spill too many on my tshirt, I decided to try covering the stains with a stamp. I used the daisy stamp I made last year. The stamp didn´t quite cover up the stain; it is still sort of visible through the paint. Darn. So this is still an ¨around the house¨ tshirt. Still, I think it turned out OK in general.


Scorching Bay, near our old flat, Wellington, North Island, New Zealand

Thursday, April 7, 2011

More printing on stones

I´ve had a go at printing one of my larger hand-carved stamps on larger stones. It seems to get progressively harder to find smooth stones in a larger size. I suppose that makes sense. This was the only print that remotely turned out OK, and even then I had to retouch it with a black marker to fill in bits that didn´t print completely. For larger, less even stones, simpler prints might work better.

Saturday, April 2, 2011

Printing on driftwood

We had a great time at the beach around Kapiti on a sunny autumn day and I got the chance to collect some driftwood to try some prints on. Its quite hard to find larger, very flat pieces to try larger stamps on. These were quite small pieces.

For printing on wood, I think I used about the same amount of ink on the stamp as for stones (more than for paper, less than for fabric). The stamp had to be pressed on hard for about 10 seconds. Driftwood is never completely flat, so some bits of the stamp, which didn´t print properly, had to be touched up with a marker. I´m not sure its as useful as printing on stones though, as stones make good paperweights, fabric weights etc.

Sunday, March 27, 2011

Printing on stones

I´ve been really impressed with the stone printing on the blog Maya made. I love the geese prints. I thought I´d give stone printing a try, although all I have in the house is fabric paint (must buy block printing ink!). The only stamp I have carved that was small enough for these pebbles was my little lighthouse, which I didn´t end up using in my checkers game.

I think I´d like to do more of these, and print some more stamps on larger pebbles. It´s hard to admire something so much on the Maya Made blog, and want to do something similar, but not copy the original design (because although it´s so nice, that would be wrong). I really like the bird theme though, and as we have a lot of seagulls around our area, I might try carving some stamps of seagulls.

Printing on stone was bit different to printing on fabric or paper. The stamp needed to be loaded with a middle amount of ink (more than paper, less than fabric). It had to be pressed hard on the stone, without slipping; suprisingly this wasn´t hard because the stones seemed to grip the stamp. I haven´t mounted the stamps - they are still just pieces of linocut - so pressing them to the stone was easy. The stamp only needed to applied for a second or so - perhaps on stone there is no need for the ink to ¨soak¨ in. Much harder though was not getting ink from my fingers (which accidentally gets there while picking the inked stamp up) onto the stone. That will take practice.

Queen Charlotte Sound, South Island, New Zealand

Friday, March 25, 2011

Another lighthouse stamp

I´ve carved another lighthouse linocut stamp. This one is about 4.5 cm high. I´ve found lighthouses quite difficult to do, because they really need to be symmetrical, and it´s very clear when they are not!


I usually free draw things, but for something like this I pre-ruled the lines, and most importantly the centre line. Then, its quite hard to keep up the symmetry when carving it in reverse, so I´ve learnt to also transfer the centre line to the lino when tranferring the picture, although of course the centre line isn´t carved out.

Queen Charlotte Sound, South Island, New Zealand