One of the exercises in the Carla Sonheim´s Drawing Lab book is to draw a face (or two) a day. So I thought I´d start that, as drawing people is something I´m not that confident with. This person is actually slouching on a chair, looking sideways over her shoulder a bit, but you can´t quite tell that because I didn´t draw the arms, lol... Note to self - draw the arms a bit more next time!
Wednesday, September 21, 2011
Friday, September 16, 2011
Travel Sketch: Czesky Krumlov

Another travel sketch, this time of a sign I saw in the beautiful village of Czesky Krumlov in the Czech Republic, I think, or possibly Slovakia. This one I will colour in watercolour, but I thought I´d take a photo first.
[Wow - I can´t believe I won one of this month´s prizes at the Sketchbook Challenge Prize!!! A vellum journal, which I am so grateful for, and will use heaps. Thanks to all the Sketchbook Challenge organisers and Strathmore (who make the journals)!]
Tuesday, September 13, 2011
Travel sketch: Gyor, Hungary
[Wow - I can´t believe I won one of this month´s prizes at the Sketchbook Challenge Prize!!! A vellum journal, which I am so grateful for, and will use heaps. Thanks to all the Sketchbook Challenge organisers and Strathmore (who make the journals)!]
Saturday, September 10, 2011
Build your own printing press etc
I want to build my own printing press and silk screens, and I keep losing my bookmarks to the relevant pages... So note to self, here are the pages for the things I want to build/try this year:
How to build a screen for screenprinting from a photo frame.
How to screen print using an embroidery hoop for the screen (also using mod podge instead of screen filler)
How to build a printing press (6 tonne).
How to build a screen for screenprinting from a photo frame.
How to screen print using an embroidery hoop for the screen (also using mod podge instead of screen filler)
How to build a printing press (6 tonne).
Thursday, September 8, 2011
Cat on boat line drawing
 A line drawing further expanding on the Cat on the Boat idea. I thought this time I would make more of an effort to draw the picture a few times and plan it all out better before carving a linocut of it. I´m quite happy about this black india ink sketch, which is on A6 sized card paper. Although I quite like drawings in the style, I thought I´d make the linocut alot more stylised.
Wednesday, September 7, 2011
Cat on a boat, but not afloat
Stamped bookmarks

I was experimenting with my russian-themed handcarved linocut stamps, and thought I´d make some into bookmarks. I like these, although I won´t be using the textured paper (far right and 2nd from the left) again. I´m a bit suprised at how hard it is to get a good print off the band of trees stamp. My online research says that I may need more pressure for the printing, or to try dampening the paper. Some sites also suggest that linoleum can be slightly uneven and may warrant sanding down before use, and has a shelf life of 6 months (who knew?). I have had better prints after heating the block-printing ink before use, and I´m wondering whether heating the lino before printing might have some effect. I´m curious to try all these things.
Saturday, September 3, 2011
Russian themed handcarved linocut stamps
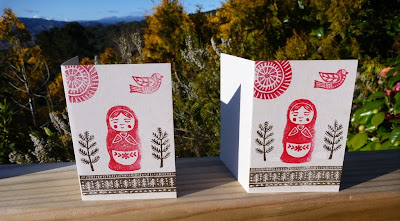
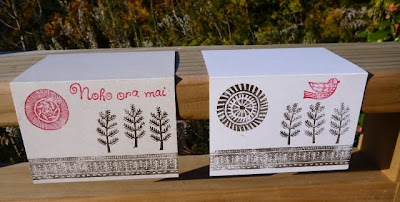
I´ve seen some amazing russian themed stamps on the internet and thought I would try something in this style. The russian doll stamp was inspired by this amazing print, the original so much better than my imitation.
The paper in the lower picture is quite textured and the long tree-lined stamp doesn´t print well on it. But I´m happy with the stamp design, and I´ll just do it on smoother paper next time.
I used red and sepia FAS water-based block printing ink. I think if I used green instead of sepia, these could be Xmas cards for my cards to my family.
Noho ora mai means ¨Stay well¨ or ¨Good health¨ in maori.
Handmade envelopes from A4 paper
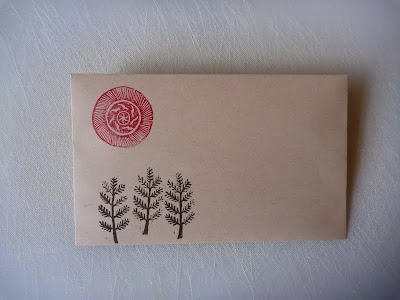
I´ve made some hand-stamped envelopes from A4 paper, and I thought I´d put up a tutorial on how to do it. Why not.
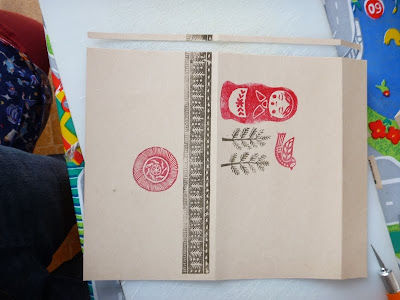 Step 1 (above). Start with an A4 piece of paper. I´ve already stamped the one above. It will make sense where the stamps need to be placed once you see one finished. In the above photo, I had a sun stamp that was meant to be in the centre of the back of the envelope, So I measured whether it was in the centre, found it was off bit a bit, and trimmed it a bit at the side.

Step 2 (above). Fold the bottom half of the paper up to within about and inch short of the top of the page.
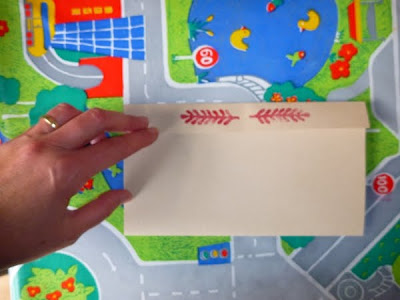
Step 3 (above). Fold the top leftover inch of paper down. I´ve used a different envelope to show this step, as I forgot to take a picture of this step when doing the original tutorial.
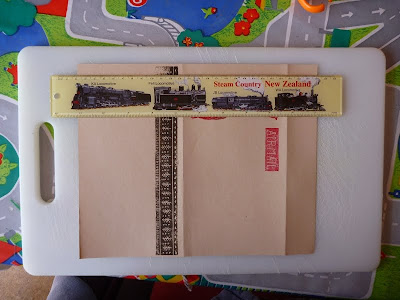
Step 4 (above). Lay it flat again. The envelope in three parts. On the far left is the back of the envelope, the middle section will become the front of the envelope, and the tiny right hand section is the flap. Put a ruler about half an inch in from the side and with a craft knife cut a line along the left section and the right section only, LEAVING THE MIDDLE UNTOUCHED.

Step 5 (above). Cut a notch out of the top and bottom of the middle section as shown, which will make the two cut bits fall off. Repeat for the other side of the envelope. See photo below for how this looks when done.
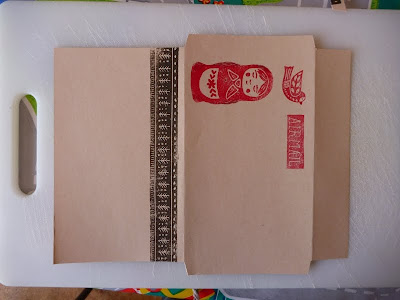
You can see now how the stamps need to be placed for an envelope. That is, they need to be in far enough from the side to leave enough room for the side flaps. When I am stamping an envelope, I fold it first (as in step one), and just guess how much room to leave for the side flaps.
Step 6 (below). Now cut a notch out of either side of the envelope flap as shown below.
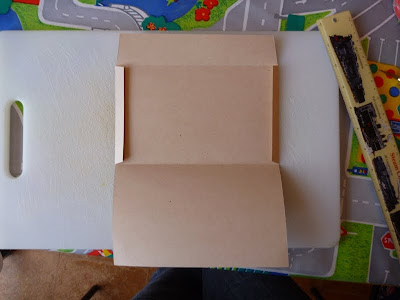
Step 7 (below). Fold the side flaps in. Its easiest to do this if you fold the back up first.

Step 8 (below). Unfold the envelope again as shown and put glue on the side flaps as shown.
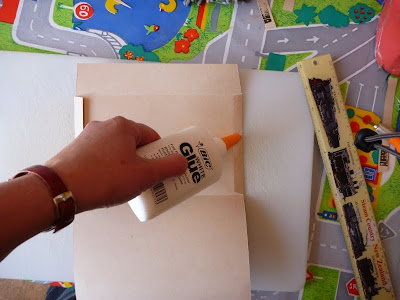
Below: this is how much glue I use. If you use too much it will warp the paper.

Step 9 (below) Fold the back of the envelope over and press it onto the glued flaps. Run your fingers tightly along it to press the glue flat and make it stick well.
This what the front of the envelope will look like (below).

And this is what the back of the envelope will look like (below). The side flaps have been folded in and the back pressed over them, so they are no longer visible. The top envelope flat is not glued yet (after all, you have to leave it open until you are ready to send the letter!).

When you are ready to send the envelope, I would just glue the top envelope flat closed with glue again. However, if you want to have self-adhesive glue on the envelope flap (for example, if you are selling envelopes for a person to use themselves later), then there are remoistenable glue recipes here. I haven´t tried them yet though.
Have fun!
Subscribe to:
Posts (Atom)


