
I´ve only ever seen this game done with pen and paper, but I thought it would translate well to a floor game. I think the game is called
Dots and Dashes, but maybe it has other names too.
MAKING THE GAME
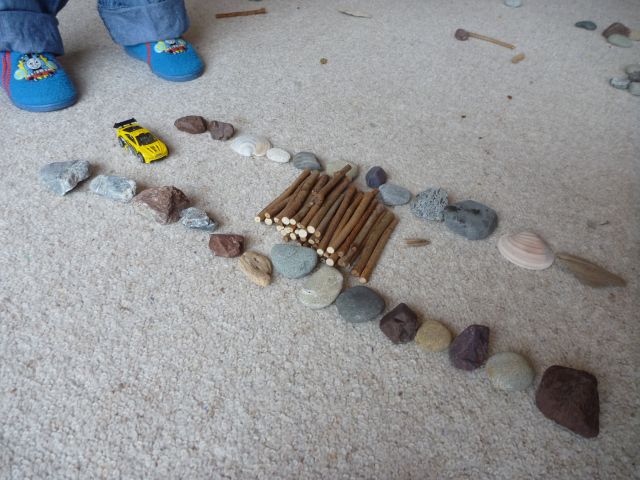
This has been made with 10 cm sticks (cut from longer twigs after we trimmed the garden hedge). The sticks are about 5mm thick and easy to cut.
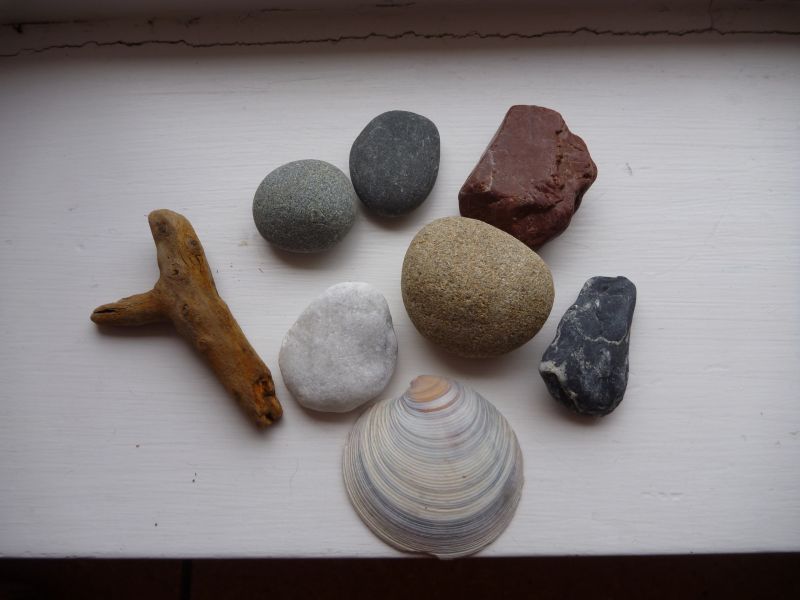
You need one set of markers for each player. Its usually a 2 player game, but no reason why it couldn´t have more players. The kids and I collected pebbles from the river, and initially I thought we would have a different coloured set of stones for each player. The blue stones turned out terrifically, but I really preferred leaving the stones unpainted. in the end. So, use stones, shells, driftwood, pumice, large sticks cut into disks etc etc. 
I´d make about 60-80 sticks in total, and collect about 10-30 markers of each type for each player. If your kids are young, they will probably be happy to have the game end when the markers run out, so do a small number, say 10. For older kids, collect more markers. Pictured right are some different types of markers I found at the beach and river. I´ve since made little bags for the game to hold the pieces.
RULES OF THE GAME
Each person chooses whether they want the their marker to be shells, pebbles etc (whatever you have collected). Each player has their pile of markers beside them.
Have the sticks in a pile so everyone can reach them.
To start, put a stick in the middle of the floor.
Then each player lays down one stick in their go. You can lay down a stick to make the side of a square in any direction, but it has to be touching the end of an existing stick.
The aim is to be the person to lay down a stick that finishes the fourth side of a square – then that person puts one of their markers in that square and it gives them one point. At the end of the game, the winner is the person with the most markers placed.
The game ends when the last stick is used, or person has used up all their markers (whichever you choose).

I was inspired to do this game for my 5 year old son after reading The Creative Family by Amanda Soule-Blake.
It wasn´t quite all smooth sailing collecting the pebbles and things for the game though.... My eldest preferred to collect gravel instead of pebbles at the river ;o), and my one-year old biffed the eldest on the head with his pebbles a few times. We collected sticks together from our garden hedge, but my eldest took them away to make a house for his wombat. So, I really did most of the actual collecting and making myself when the kids weren´t looking. But since making the game, we do make a point of gathering things together for it, like pumice and driftwood at the beach, and that´s been a lot of fun. And I´ve had a lot of fun thinking through the logistics of making the game.
My eldest might be a bit young for a game like this, but I think he´ll grow into it. He kind of likes it, but prefers to make pictures with the sticks and stones instead. But that has been fun too. Here are some other things to do with the pieces...


Kaikoura, looking south, South Island, New Zealand
 Here is a bag for carrying a lightweight pram around. Why would someone need this? Well, I often find that, when catching a bus or ferry, I have my hands full carrying kids and gear. I don´t have a spare hand free for the pram. Or if I do, I need that hand to hold onto a railing or something. I´ve had Wellington bus drivers start the bus again, while I´m still finding a seat, while carrying a 6 month old baby, all my bags, and holding a 4 year old´s hand, plus dragging a pram behind me. So, having a hand free is pretty useful.
 Baby seals near Kaikoura, South Island, New Zealand


